
Connecting Colab to a local machine
20220209191322

Google Colab is a great offering (at least at the moment is) because it is free and allows you seamless access to both GPU instances and TPU instances that you can train the models on.
The usual workflow (and recommended one) for developing in Colab is (also discussed in [[20220128192053]] Switch GPU to CPU using the aws-cli):
- [CPU] prototype the ETL pipeline(data)
- [CPU] develop and debug the model (make it work)
- [GPU] train the model (fitting)
- [CPU] debug the model (evaluate)
- [GPU] optimise the model (performance)
- [GPU] hyperparameter optimisations
- [CPU] analyse hyperparamter optimisation results
- [multi GPU] run the optimised model on the full dataset
Because with Colab the change of instance type (CPU / GPU) is as quick as selecting an element of a dropdown, you can use the pattern above most of the time, but only for points 1.-3.
The problem with Colab is that it lacks persistence. Once you leave it unattended for more than 30 minutes (and depending on the instance type) it will timeout and disconnect from the remote Jupyter host which means losing that instance state (most of the time).
This means that when you are at 3. you can see how the training progresses, that the model is working, and if you are lucky enough and the model isn’t too demanding, see it finish. But after this point, you need to save the model and go back to the CPU. You can do this via the Google Drive addon, but the free space for that is limited (15 GB) and shared between all your Google apps (Docs, Spreadsheets, Drive, etc..).
Even if you manage to solve (or are not bothered by) the storage issue, there is still the nagging problem of runtime disconnects after a period of inactivity, and most of the steps after 3. are long-running activities. Not to mention that excess usage of GPU will temporarily ban you (1 day) from instantiating a new machine.
On the other hand, you could try with your own hosted server (say on AWS) and make it switch runtimes (CPU/GPU) almost as easily as in Colab (see [[20220128192053]] Switch GPU to CPU using the aws-cli for how you’d do this). But this means one of:
- [Colab -> AWS] downloading the notebook and importing it on the remote machine
- [AWS only] working exclusively on the AWS instance
The first option causes needless friction and you also end up with two versions of the same work (the Colab one, and the post-Colab one that probably contains lots of fixes).
The second option maintains a single timeline of the work and is almost friction-less but you lose some Colab nice features:
- ability to share and comment on the notebook
- ability to see the notebook even without the instance running
- nicer autocomplete
Best of both worlds
There is though a third possibility:
- Use Colab always (where you will store the notebooks)
- When closing in on steps 3.-8. switch to a private AWS server
You can do this because Colab allows you (for now) to connect to a local jupyter environment (with some quirks). This means that you can have the workflow below:
- [Google][CPU] prototype the ETL pipeline(data)
- [Google][CPU] develop and debug the model (make it work)
- [Google][GPU] train the model (fitting)
- [Private][GPU] train the model (until finish)
- [Private][CPU] debug the model (evaluate)
- [Private][GPU] optimise the model (performance)
- [Private][GPU] hyperparameter optimisations
- [Private][CPU] analyse hyperparamter optimisation results
- [Private][multi GPU] run the optimised model on the full dataset
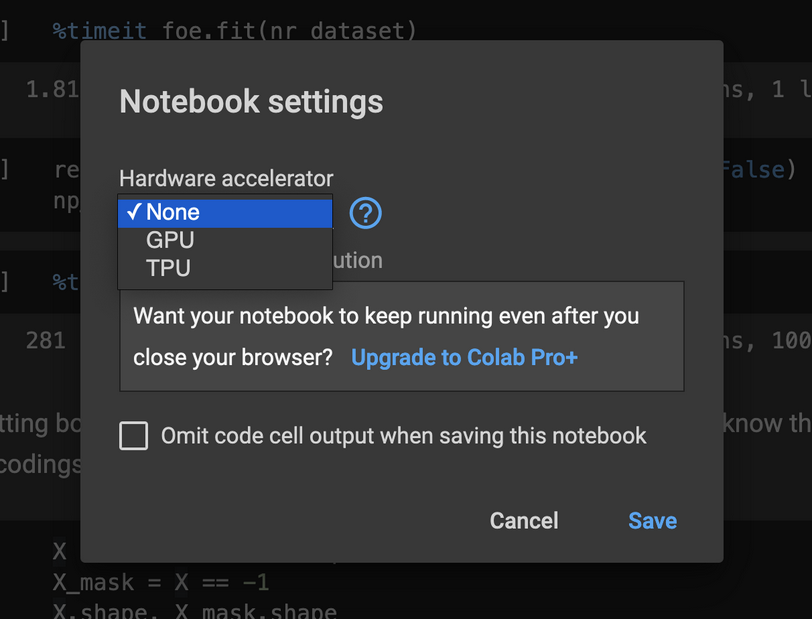
The setting for switching to a private server is in the top right corner:
To make it work you need to do the following steps (assuming you already have a private server with Jupyter installed on it):
- (One time) On your server install / enable the needed Colaboratory extensions
pip install jupyter_http_over_ws jupyter serverextension enable --py jupyter_http_over_ws - On your server start jupyter using the following command
jupyter notebook \ --ip=0.0.0.0 \ --NotebookApp.allow_origin='https://colab.research.google.com' \ --port=8888 \ --password='' \ --NotebookApp.port_retries=0 \ --NotebookApp.token='<some_long_token_here>' - On your laptop forward port 8888 to the server port 8888. For some reason, choosing other port than 8888 on the local machine doesn’t work with Colab, so YOU MUST use 8888
ssh -i ~/.ssh/key.pem ubuntu@10.10.110.100 -L 8888:localhost:8888 -N - On your Colab page (opened on the laptop used to port forward 8888) choose the “Connect to a local runtime” from the dropdown menu of “Reconnect” and set the following address:
http://localhost:8888/?token=<some_long_token_here>
That’s it, Colab should connect to the private server. The setting (URL) for the remote will be persisted (to you) on the notebook but the people you share this with will not be able to see it. Couple this with [[20220128192053]] Switch GPU to CPU using the aws-cli and you might just have a clean and efficient way of developing #dl models!

Comments